Social media videos are a key element when marketing a property and getting your videos right can make a huge difference to your prospects of getting the deal you want, therefore you may want to consider mastering property filming. In our latest guide for real estate agents, we look at the dos and don’ts of property filming to help you master video presentation.
In today’s competitive real estate market, the visual appeal of property listings is more crucial than ever. Clean-cut videos can captivate potential buyers, providing an immersive experience that photos alone cannot achieve. While hiring professional photographers and videographers is a great option, it’s not always feasible due to time or budget constraints. Fortunately, with advancements in smartphone technology, you can now produce stunning 4K property videos on your own. This blog will guide you through the essentials of filming and editing your listings, ensuring you can create impressive content with ease.
Table of Contents
Essential Tools for Mastering Property Filming
Get Equipped
Before you dive into filming, it’s important to have the right tools. Whether you’re using a smartphone or a camera, here are some must-have items:
Gimbal: A gimbal is crucial for stabilizing your shots, providing smooth and professional-looking video pans and movements.
Lighting: Quality lighting can make a huge difference. Use additional lighting for close-ups, and ensure that your shooting location has plenty of natural light to enhance the overall video quality.
Microphone: Planning to include audio? A high-quality microphone will ensure clear sound for your commentary or guided tour.
Camera: Whether you decide to use a smartphone or traditional camera, opt for a device that shoots in high resolution to guarantee sharp, detailed videos.
With your equipment ready, it’s time to plan your shoot effectively to capture the property’s best features.
Planning Your Shoot
Step 1: Identify Key Features
Start by creating a list of the property’s unique selling points. Consider standout features like LED lighting, granite countertops, or a beautifully landscaped garden. Having a checklist ensures you won’t miss any critical details during filming.
Step 2: Consider Reflections
Walk through the property and identify any rooms with mirrors or reflective surfaces. Take a few test shots to find the best angles, avoiding unwanted reflections of yourself or your camera.
Step 3: Choose the Right Time
Plan to shoot when natural daylight is at its peak. Schedule enough time for a thorough walkthrough and additional shots if needed. The time required will vary depending on the property’s size.
Step 4: Room-by-Room Focus
Film each room methodically, highlighting details that make the property unique. This systematic approach helps ensure you capture every angle and feature effectively.
Setting Up for Quality
With today’s advanced smartphones, achieving high-quality video is easier than ever, as long as your settings are optimized. Here’s how to set up your smartphone for the best results:
iPhone Settings
1. Enable ProRes: Go to Settings > Camera > Formats, and make sure “Apple ProRes” is turned on for superior video quality.
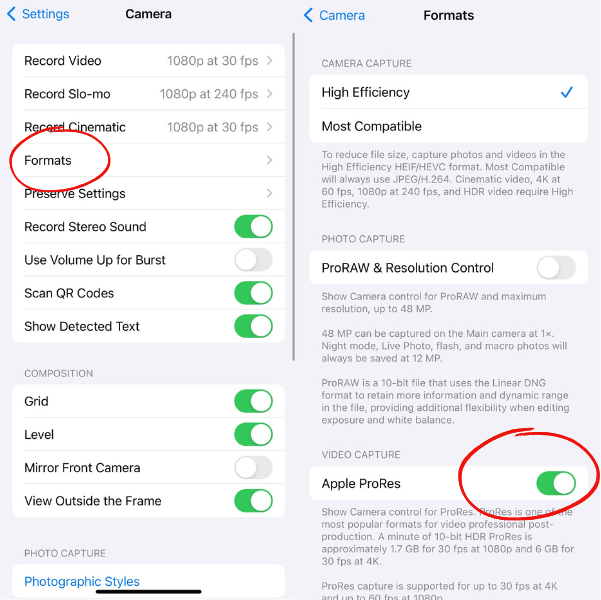
2. Use the Grid: In the Camera settings, enable the grid to help with framing and stabilizing your shots.
3. Adjust Video Resolution:
– For regular videos, set to 4K at 30 frames per second.
– For slow-motion videos, set to 4K at 60 frames per second.
This can be done in the top right corner of your iPhone.
Creative Shooting Techniques
To make your property videos stand out, experiment with different types of shots. Here are a few techniques to try:
Dolly In: Move the camera forward into a room or toward a feature, creating a sense of depth and focus.
Dolly Out: Start with a close-up of an object or room, then slowly pull the camera back to reveal more of the space.
Pan (Side-to-Side): Pan the camera horizontally to capture a room or feature from various angles.
Filming Tip: Bend your knees, and walk slowly. Keep your elbows tucked to stabilize the camera and avoid a shaky frame.
Editing Your Video
Once you have your footage, the next step is to edit it into a polished video. The CapCut app is an excellent tool for this, and it’s available on both phones and laptops.
Step 1: Order
Open CapCut > New Project > Select Video Footage > Add.
Arrange your clips to follow the sequence you would use when showing potential buyers the property.
Step 2: Adjust Speed.
You can enhance your video by adjusting the speed of certain clips.
Select Video Layer > Click Speed > Click Custom.
Add beats to mark where you want to change the speed. Drag the beat up to speed up the clip, or drag it down to slow it down.
Step 3: Add Subtitles
Subtitles can highlight important features or provide additional commentary.
Adding Text: Text > Add Text > Type in Caption > Select Fonts > Select Animations.
Font Recommendations: Here are some popular fonts that will help to give a good look to any subtitles or captions you use:
– Vogue
– Lucette
-Employed
Step 4: Export:
Export your final video in high resolution for optimal viewing quality.
A resolution of 1080p is recommended for high-quality video.
Making the Post
Once you are finished editing your video, it’s time to post. Here are the steps you need to follow for the main social media video platforms:
1. Post as a Reel: Tap POST > REEL > Select Video > Next.
2. Add Music: Tap the music icon to add a sound. Adjust the levels in the controls if your video already has audio.
3. Add Caption: Write a caption that includes a call to action. Add a few relevant hashtags at the end of your caption.
4. Edit Cover: Create a cover in Canva or choose a frame from the video. Adjust it to fit your profile grid.
5. Additional Options: Add location, tag relevant people (e.g., stagers, videographers), and choose topics like home or business.
6. Share: Click SHARE to publish your post.
TikTok
1. Create Post: Tap the icon to create a post, upload the video, and click Next.
2. Add Sound: Choose a trending sound to accompany your video.
3. Add Caption: Include a call to action and relevant location details.
4. Post: Click POST to share your video.
By following these steps, you can create and share high-quality property videos that stand out in a crowded market. Start experimenting today to enhance your real estate listings and attract more potential buyers.